Thursday, November 14, 2013

Foundation Paper Piecing: A Tutorial

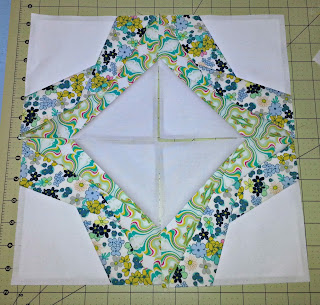
Hello Beautiful! I hope you are having a great week and getting in some crafty time. Today I am bringing you my very first ever tutorial.  I have chosen to do this on Foundation Paper Piecing a quilt block. I thought since this months block for my Simply Solids Modern Bee block was a Foundation Paper Piecing block this would make for a great tutorial.  I just absolutely love this technique.  It makes for perfect lines and points. The blocks are usually very geometric in design and look very clean and sharp when finished.

For this tutorial we will be using Icky Thump by 627Handworks. You can visit her blog and download the pdf file.  You will need to print 4 copies for one block.  I have chosen to use Kona White as my background color and am using two prints from the Carnaby Street fabric line by Pat Bravo for Art Gallery Fabrics. For each of the 4 sections I have cut 2 Kona White 5 inch squares, and 2 each - 2.5 x 7.5 inch strips of the other two fabrics. So now we are ready to get started.

First cut out your foundation papers along the dotted line edge.


Next fold the paper along each of the lines.


Next we are going to lay and pin our first piece in place.  If using a print you will want to lay it right side up on the backside of the foundation piece. Pin in place.


Then we will fold the foundation paper back along the line between sections 1 and 2.  Using a ruler trim fabric to 1/4 inch seam allowance.  You will then lay your next stripe of fabric right side down on top of the first fabric lining up the long edge.


Now stitch along the line between sections 1 and 2, making sure to stay on the black line and using a short stitch length  (this would be about 1.5 on most newer machines).  The short stitch length will make it easy to pull the paper pieces off at the end. Once you have stitched on the line finger press the strip back.  Do not use an iron as the fabric can easily get distorted. 


Now you will repeat these same steps for each section of the block.


Once you have sewn on all the pieces, turn the square over and trim the edges.


Now arrange your sections and decide what look you want to your for your block.  


Finally, sew your squares together using a 1/4 inch seam allowance.
 
There you have it, easy peasy.  I hope this will become a regular part of your quilting.  It is really enjoyable and once you get the steps down it will become second nature to you.  I bet you will even try your hand at designing your own pattern.
 
 
Here is another quilt I am working on that started with a Foundation Paper Piecing pattern.  I used Ice Star by Sarah Bailey and more Carnaby Street fabrics by Pat Bravo for Art Gallery Fabrics.
 
 
Well that's it for today.  I hope you have a crafty type of day!


http://prettybobbins.com/


Thursday, November 7, 2013

Houston International Quilt Festival 2013

What an awesome weekend this was.  Let me just start with the fact that I normally work Friday, Saturday and Sunday every week.  I am in the medical field so those are 12 hour shifts.  I never get to go out on Friday or Saturday nights for obvious reasons. But the weekend of the Houston International Quilt Festival is something special.  I happens to coincide with the Lone Star Bike Rally each year.  So I requested to be off for this last weekend 3 months in advance.  I look forward to this specific weekend all year long.  It is the one weekend that my hubby and I share both our interest with each other and spend the whole time together, without children. That never happens either.

We started out the weekend in Galveston at the Lone Star Bike Rally.  I just love looking at all the custom motorcycles, listening to some good country and rock music, and having a nice ice cold beer or two or three.  This year we meet up with two of my brother-in-laws and my sister-in-law.  We had such a great time and also saw some old friends we had not seen in several years. 


Now onto Quilt Festival. It was awesome, and awe inspiring.  The talent shown at the Houston International Quilt Festival is just amazing.  I can only dream of having a quarter of the talent these quilters have.  I also met a couple of the lovely ladies that I follow on Instagram including Cristy Fincher (cristycreates) of Sewmuchlikemom.com , Mary Williams (maquilts1), and Heather Grant (monderndayquilts).  They were all so sweet and I look forward to seeing them again at other quilting events. 
 
I hope that next year I will be able to attend Quilt Market instead of Festival, if I ever get my business going.  Right now that only includes selling to my co-workers.  They sure make a girl feel awesome and loved.  It's always nice when other want to buy things you make. So while I work on my skills, let me show you some of the gorgeous quilts.
 
Alice's Kitchen by Miki Murakami
 
The Great Barrier Reef by Miki Murakami
 
 Believe II by Reiko Nobata
 
Jack by Sandy Curran
 
Together in a Friendship World by
Geta Grama and Quilt.Ro Group
 
It's All About the Journey by
Tonya Littmann
 
Masquerade by Birgit Schueller
 
 
And The Flag Was Still There by Rob Appell
 
Sushi Surprise (place setting quilt)
 
These are just a drop in the bucket of all the quilts in the show.  As you can tell, my eye is really drawn toward the modern art quilts.  I just love the creativity of these quilts and can only dream of ever being this talented. 
 
 And now a little share of what I have been working on.  I am working on a baby quilt that I am designing.  I just need to grab some more of the green paisley print from the Scrumptious line by Bonnie and Camille to finish the top and bottom borders.  I'm thinking of using one of the larger floral prints for the backing and doing a scrappy binding.  I am working on writing up the pattern to sell.  Please let me know what you think about it.


Then I used some of my scraps to make these Christmas ornaments.  I think I am going to add some white or iridescent glitter and either a bow or some feather boa trim to the tops.

 
I also made this cute little Hang It Charge It phone sleeve.  I thought what an awesome idea.  These are meant to be used when you have a plug but no table to set the phone on.  Now it doesn't have to lay on the floor where someone might step on it.
 
 
And one more zipper pouch made for a customer.  Don't you just love the fussy cut in the front?
 

Well that was my weekend.  It was great.  I can't wait to get to do it all again next year! Have a crafty kind of day!


Linking up to:


http://tgiffriday.blogspot.com/

http://prettybobbins.com/